Whether you’re celebrating a mother, grandmother, sister, or friend this May, we find that homemade gifts really hit the spot for any mother figure in your life. And with Mother’s Day coming up on May 8th, a DIY gift is perfect for those on a time constraint or budget. For the less crafty audience out there struggling to get a grip on this whole DIY craziness, don’t be scared because we made sure that these gifts are indeed easy to make. The best part of it all is that it’ll accentuate the one thing mom works so hard to maintain every day: Your Home. So get your toolboxes out and get ready to use those hands because here are 6 simple DIY Mother’s Day gifts that’ll glam up your home.
1. Mini Photo Magnets
 Photo source: sundaesins.blogspot.com
Supplies Needed:
1. Photo Printouts – Make sure to get them in the size that you want from any Walmart/Walgreens/CVS etc.
2. Glue – Use PVC or UHU for refining edges
3. Cardboard Backing/Mounting Board – You can find this at any art store or just use any thick paper that looks nice
4. Magnets – You can find these at Benjamin Franklin or any craft store
5. Cutting Supplies
Instructions:
1. Glue the photo printouts onto the cardboard backing so that you have a sturdy surface to glue the magnets on
2. Cut out the photos with the cardboard backing into any shape or design you want. You can even leave a little room at the end to write little memos for mom reminding her about the events in the photo.
3. Glue the magnets onto the backings
4. Stick them on your fridge and use it to hold up a Mothers Day card or a message for mom
2. Gardening Gift Basket
 Photo source: iheartnaptime.net
Supplies Needed:
1. Empty Bucket – You can find these at Lowes/Michaels/Target
2. Gloves
3. Shovel/Gardening Tools
4. Seed Packets – Choose your mom’s favorite flowers
5. Skewers – You can use popsicle sticks too
6. Tape
7. Ribbon
8. Tissue Paper – This is to fill the bottom of the bucket
Instructions:
1. Tape the skewers or whatever type of stick you use to the back of the seed packets
2. Fill your bucket with the tissue paper to give it stabilization. Then fill it with the gardening tools and seed packets. Check out Target’s dollar section to find some great gardening steals!
3. Tie the ribbon around the bucket to give it some decoration
4. Glue your mother’s day card on a stick and then place it in the bucket as well
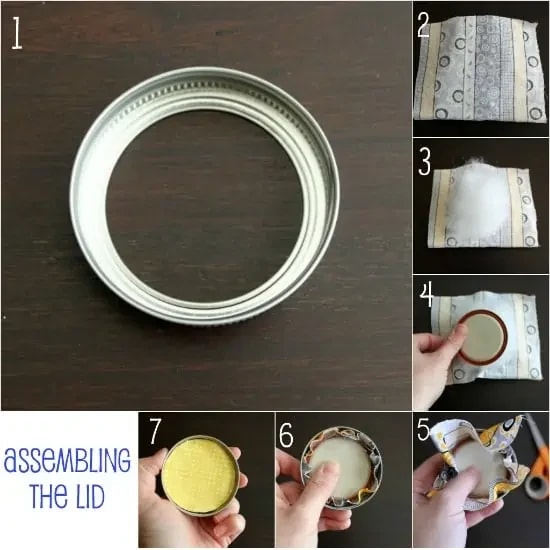
3. Mason Jar Sewing Kit
Photos source: waittilyourfathergetshome.com
Supplies Needed:
1. 3-4 Small Mason Jars – You can get these from Target
2. Your Mom’s Favorite Fabric – You can also use old clothes if you don’t have fabric
3. Cotton Balls/Pillow Stuffing/Fiber Fill
4. Scrapbook paper
5. Hot glue gun
6. Straight pins and any other sewing material small enough to fit in the mason jar
7. Pen/Pencil
Instruction:
1. To get started, trace the lid of the mason jar onto the wrong side of the scrapbook paper. These circles will be used on the inside of the lid to give the jar a more finished look.
2. Do the same procedure for the fabric. This doesn’t have to be perfect since you’ll be cutting the excess trim off.
3. Cut both the paper and the fabric along the tracing
4. Lay the rim of the lid on a flat surface (top facing downward) and then place a piece of fabric on top of the rim, wrong side facing up.
5. Place a small handful of cotton balls/fiber fill on top of the fabric.
6. Position the lid of the mason jar over the fiber fill.
7. Push the lid, fiber fill, and fabric slightly through the mason jar rim. It should pop out a bit so you’ll have an area to poke straight pins into.
8. Once you’ve gotten the lid pretty secure inside the rim, trim any excess fabric and use your hot glue gun to get the fabric to lay flat.
9. Cover the inside of the lid with the scrapbook paper circle you cut out first to hide all the jagged fabric edges and hot glue.
10. Stick some pins on the top of your jar and place small sewing materials inside the jars. The beauty of this is that mom now has her sewing kit all in one place and can see which jar contains what.
4. Ombre Wooden Spoons
Photo source: sayyes.com
Supplies Needed:
1. Set of wooden spoons – You can get these from Walmart or Amazon
2. Masking Tape
3. 2 Bottles of Paint – Your mom’s favorite color + White (to get different shades from one color). Check out
Martha Stewarts Craft Paint
4. Paint Brush/Foam Brush
5. Mason Jar
6. Pretty ribbon
Instruction:
1. Get the masking tape and mark off where you want the paint to end on your wooden sticks (do this to every stick). Make sure that the tape is straight so that the paint will be straight.
2. With your paint brush/foam brush, paint even strokes of your mom’s favorite color onto the handle of your first spoon.
3. Add some white paint into your mom’s favorite color to go one shade lighter and then paint the next spoon handle with this color
4. Keep adding the white paint into your mom’s favorite color until you get a different shade for each spoon
5. Take the tape off the spoons once you’re happy with the lining
6. Allow the spoons to dry for about an hour or two and then wash the spoons off
7. Tie a bow with the ribbon onto the mason jar and then place the spoons in the jar
5. Recipe Card Holder
Photo source: homebodyholly.com
Supplies Needed:
1. Picture Frame – You can get one that’s just laying around the house or find one at a thrift shop
2. Pretty wrapping paper
3. Glue gun
4. Forks
5. Paint (optional) – To paint the border of your picture frame
Instructions:
1. Cut the wrapping paper to the size of the picture frame and then place it behind the glass of your picture frame (If you don’t like the color of your frame, you can always paint the border color of your choice)
2. Bend the two middle tines of the form upward (you may need some extra manpower for this)
3. Hot glue the fork onto the glass and then wait a couple of minutes for the glue to dry. You can use one or two forks depending on how much support you want the holder to have. If you decide to use two forks, make sure that they are aligned the same on the board.
4. Place the recipe card on the fork and you’re done.
6. Mason Jar Picture Frame
Photo source: homestoriesatoz.com
Supplies Needed:
1. Mason jar
2. Pantone’s Radiant Orchid paint by Valspar
3. Paintbrush/Sponge brush
4. Vinyl shape or sticker and picture
5. Tape
6. Clear spray paint
7. Plastic cup
Instructions:
1. To create your picture frame window on your jar, place vinyl or painter’s tape on the area that you don’t want to be painted. You can cut the vinyl into any frame shape you desire.
2. Paint the outside of the jar and immediately remove your sticker. You do not want to wait until the paint is dry or else it will be difficult to remove your sticker.
3. Cut the picture you want to use to the size of the vinyl and then tape it to the inside of the jar so that the photo is facing outward
4. Seal the outside of the jar by spraying it with clear paint.
5. Place a paper cup inside the jar, fill the cup with water, and place your flowers in the cup. Your picture will be ruined if you fill the inside of the jar with water.
6. Allow the spoons to dry for about an hour or two and then wash the spoons off
The whole Atria Real Estate team wishes every mother a very happy Mother’s Day!